I have restored the silicon pr0n wiki from an old backup so it should be less of a skeleton now. Find it here:
http://siliconpr0n.org/wiki/doku.php?id=start
It may be a bit rough around the edges still as a lot of things hadn't been polished up yet after the Wikispaces conversion
If you want to contribute send me a brief e-mail with your interests in IC RE and I'll create you an account.
Monday, February 20, 2012
Saturday, February 11, 2012
Tile stitch
Now that I have a microscope that can generate lots of imaging data stitching has become the bottleneck. I forget exactly how long but the large memory requirements of gigapixel (GP) sized images made it take a day or so to stitch on my desktop. I might have been fine with this except that something, I suspect enblend or one of its libraries, seems to generate a number of glitches when the images get very large. I've seen this on both 32 and 64 bit systems and should probably file a bug report... In any case, I wanted to reduce system requirements since I figured there was a way to do things better.
Recently I've been playing around with the Google maps API as an idea to use tiles instead of viewing the huge source images. I first played around and tiled a visual6502.org image, the MOS 6522 that you can find here. This is nice as people without powerful computers can view this large image at full detail. To be fair the jpg compression also significantly reduced its size although not to a point where significant quality was lost for my purposes. The tool to do this can be found here.
However, this still leaves the question of how to avoid creating the large intermediate images. After some thinking I came with the following:
Step 1: get an optimized .pto
You can get this from any source you want. I am using my pr0nstitch program (discussed in a previous post) which I then optimize for size and crop in Hugin. While the Hugin stage could probably be automated its at least doesn't take very long and gives me an idea of how well the optimize went before trying a full stitch.
For this example I'll show a smallish input image. When stitched with Hugin it looks like this:
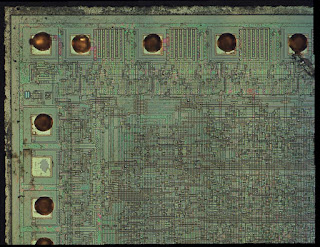 As an aside, this is a MOS 6522 that I used HF to remove the passivisation and then ate out the metal. Then end result is that you can still see where the metal was (because there is still a lot of SiO2 leftover) while still seeing all of the bottom layers.
Heres a visual from Hugin of what the input looks like:
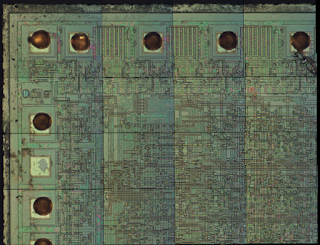 I think the color gradients are related to me using semi-polarized light on high quality but not strain free objectives (Mitutoyo plan apo 20X). On the bright side it makes the source image boundaries much more pronounced.
Step 2: pick the largest single panorama size you want to stitch
Ideally the supertile should be the largest size that enblend can fit into RAM (and is error free per the bugs I've had...). The software chooses 4X4 source image size by default (~2.5 X ~2.5 shown above) and has a command line option to customize.
Step 3: stitch the selected region
Remap (nona) and blend (enblend) to form a single large panorama image (a "supertile") that is a fraction of the entire output.
Step 4: generate tiles
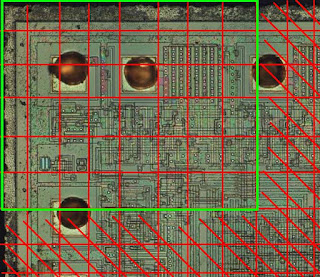
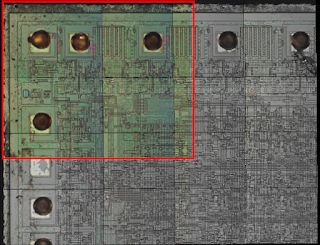
Greedy generate all tiles that are "safe" following the criteria from the last bullet above. I assume that images around the full panorama are fully safe as well as any images that are more than a half image width in from the border. Add these to a closed list as other supertiles may be able to regenerate them.
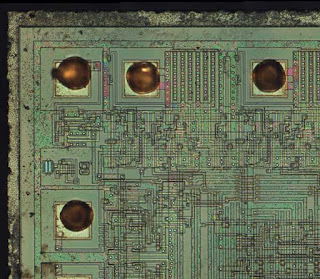
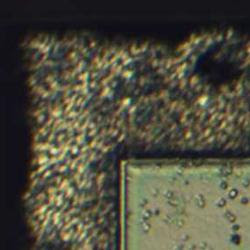
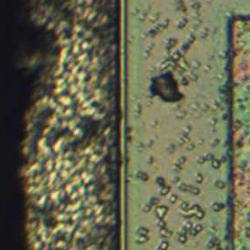
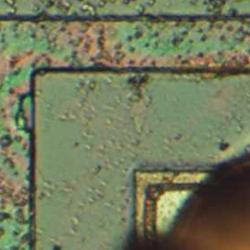
In the visual the red crosshatched areas represent areas that are considered unsafe because they are too close to an area where the blending could vary across supertiles. The green boxed in area are all tiles that we can safely generate. Here are a few actual tiles from that full sized image upper left hand corner:

Step 5: repeat for other supertiles
Shift the supertile such that you can generate more tiles safely. This works out to roughly shifting it by the border width + a tile size. Only generate the tile if its not in the closed list.
The tool can be found here.
The first actual chip stitch I generated using this algorithm can be found here. There are a few stitching artifacts but I believe they are more related to bad optimization than the stitching process. I have been somewhat lazily always choosing the upper left hand image as the reference for position optimization. In several of my large stitches images get noticeably worse as you move away from this point. Additionally, there is a bug where I can lose a tile around the right and bottom. Presumably this isn't hard to fix as its probably something I need to just round up instead of down.
The performance improvement is also pretty good. I did several GP sized images and the stitch completes in about 3 hours. I haven't played with panotool's GPU mode to see if that results in any improvement. For reference my system has a 3 GHz Woodcrest dual core CPU (although I'm currently only using one) with 12 GB of RAM. I've been using a 10 GB enblend cache. On that note, I believe this algorithm could also be parallelized to one job per supertile without too much effort.
To be fair as part of this processed I also played around with caching options and such as I learned more about how the remapping and blending phase works. Things on the TODO list for next steps:
EDIT:
For the heck of it I decided to figure out how to package this. Try it out at http://pypi.python.org/pypi/pr0ntools/1.0
Also I found that the anchor image for optimization is more important than I realized. A lot of my stitching artifacts appear to be due to my somewhat lazily choosing the upper left hand corner as the anchor which propagated a lot of errors. I'd still like to add a lens model though to see how that further improves error.
Recently I've been playing around with the Google maps API as an idea to use tiles instead of viewing the huge source images. I first played around and tiled a visual6502.org image, the MOS 6522 that you can find here. This is nice as people without powerful computers can view this large image at full detail. To be fair the jpg compression also significantly reduced its size although not to a point where significant quality was lost for my purposes. The tool to do this can be found here.
However, this still leaves the question of how to avoid creating the large intermediate images. After some thinking I came with the following:
- nona (a "remapper": transforms source images to their location in the output image) will only output images that are in the cropped area. Note that it will still spend a small amount of time on each of the other images deciding if it needs to generate it
- enblend (a "blender": resolves conflicts when two source images occupy the same area) output should only differ in areas where there's a potential conflict
- There is no potential for conflict on areas where images are unique. In particular this is the edges and there is less conflict in the center 1/3 of my images since I have 1/3 overlap with neighbors
Step 1: get an optimized .pto
You can get this from any source you want. I am using my pr0nstitch program (discussed in a previous post) which I then optimize for size and crop in Hugin. While the Hugin stage could probably be automated its at least doesn't take very long and gives me an idea of how well the optimize went before trying a full stitch.
For this example I'll show a smallish input image. When stitched with Hugin it looks like this:
 As an aside, this is a MOS 6522 that I used HF to remove the passivisation and then ate out the metal. Then end result is that you can still see where the metal was (because there is still a lot of SiO2 leftover) while still seeing all of the bottom layers.
Heres a visual from Hugin of what the input looks like:
 I think the color gradients are related to me using semi-polarized light on high quality but not strain free objectives (Mitutoyo plan apo 20X). On the bright side it makes the source image boundaries much more pronounced.
Step 2: pick the largest single panorama size you want to stitch

Ideally the supertile should be the largest size that enblend can fit into RAM (and is error free per the bugs I've had...). The software chooses 4X4 source image size by default (~2.5 X ~2.5 shown above) and has a command line option to customize.
Step 3: stitch the selected region

Remap (nona) and blend (enblend) to form a single large panorama image (a "supertile") that is a fraction of the entire output.
Step 4: generate tiles

Greedy generate all tiles that are "safe" following the criteria from the last bullet above. I assume that images around the full panorama are fully safe as well as any images that are more than a half image width in from the border. Add these to a closed list as other supertiles may be able to regenerate them.
In the visual the red crosshatched areas represent areas that are considered unsafe because they are too close to an area where the blending could vary across supertiles. The green boxed in area are all tiles that we can safely generate. Here are a few actual tiles from that full sized image upper left hand corner:


Step 5: repeat for other supertiles
Shift the supertile such that you can generate more tiles safely. This works out to roughly shifting it by the border width + a tile size. Only generate the tile if its not in the closed list.
The tool can be found here.
The first actual chip stitch I generated using this algorithm can be found here. There are a few stitching artifacts but I believe they are more related to bad optimization than the stitching process. I have been somewhat lazily always choosing the upper left hand image as the reference for position optimization. In several of my large stitches images get noticeably worse as you move away from this point. Additionally, there is a bug where I can lose a tile around the right and bottom. Presumably this isn't hard to fix as its probably something I need to just round up instead of down.
The performance improvement is also pretty good. I did several GP sized images and the stitch completes in about 3 hours. I haven't played with panotool's GPU mode to see if that results in any improvement. For reference my system has a 3 GHz Woodcrest dual core CPU (although I'm currently only using one) with 12 GB of RAM. I've been using a 10 GB enblend cache. On that note, I believe this algorithm could also be parallelized to one job per supertile without too much effort.
To be fair as part of this processed I also played around with caching options and such as I learned more about how the remapping and blending phase works. Things on the TODO list for next steps:
- Fix the clipping bug
- Start using a lens model
- Try optimizing from a center anchor instead of a corner
- Look into ways to improve the accuracy of the optimize step (ex: statistical deviations)
- See what I'm losing by using jpg's over tif's / png's
EDIT:
For the heck of it I decided to figure out how to package this. Try it out at http://pypi.python.org/pypi/pr0ntools/1.0
Also I found that the anchor image for optimization is more important than I realized. A lot of my stitching artifacts appear to be due to my somewhat lazily choosing the upper left hand corner as the anchor which propagated a lot of errors. I'd still like to add a lens model though to see how that further improves error.
Subscribe to:
Posts (Atom)
