https://github.com/JohnDMcMaster/pr0ntools/tree/master/stitch
Now that image capture is getting reasonably automated, stitching is the next bottleneck for mass scale IC -> netlist conversion. The Visual6502 team is working at scaling up their image -> netlist conversion. I recently got in contact with them and am hoping to try to get more involved. In the meantime, I suppose I'm a turbo nerd and just even looking over the layouts.
Knowing that Visual6502 had the best images, I managed to convince Christian Sattler to give me his stitch code and get it under an open source license which I somewhat arbitrarily called csstitch. You can now find it here along with some of my patches. Unfortunatly, I quickly realized that the high quality imagery from the confocal microscope had simplified a lot of the stitching. For example, no photometric optimization was being done and it was based off of autopano-sift-c (SIFT based), which I've always gotten far inferior results compared to autopano.kolor.com (also SIFT based, which I call autopanoaj since that's the author's initials and autopano is too vague). From what I can tell, autopanoaj's secret may be that it has a very good outlier detection algorithm. If you turn it off, it produces many very poor control points (features). I've also been playing around with panomatic (SURF based). My general feel has been that the quality is less than autopano-sift-c, but I haven't had enough time yet to give it a fair trial.
Having this experience and getting some ideas from csstitch, I had dabbled at making my own higher performance stitching app. With the CNC producing very accurate XY coordinates, it seemed I could heavily optimize the control point finding process. Unfortunately, there turned out to be a bunch of gotchas along the way. Some of them are due to some oddities of the .pto format, some of them due to the fact that I run autopanoaj under WINE (yuck...) since I don't want to run Windows and the Linux version is out of date.
The first step is to arrange the images into a rectangle. Since the Python Image Library (PIL) and .pto like the origin at the upper left, this seemed the natural coordinate system. At first I tried lower left since that's what I was taught in math class, but quickly realized this was a bad idea and converted the code to use upper left hand coordinate system. I added a series of flip options so that as long as you started in some reasonable grid layout, you could flip it to the upper left hand corner convention. I also pre-process the images with something like "find '*.jpg' -exec convert -strip {} {} ';'" to get rid of accelerometer data and other stuff that I found over-smart programs used to mess things up. For example, gthumb will flip images based on this and made me arrange the images wrong. Anyway, start by getting them into some intuitive grid and then flip them as mentioned earlier:
 And I had a picture demonstrating flips...but don't know where it is. In any case, these pictures are already in the correct order above, but are not named correctly for the column/row convention. I might allow parsing rows first to make the above arrangement possible. If you add a transpose, the image matrix is arranged correctly.
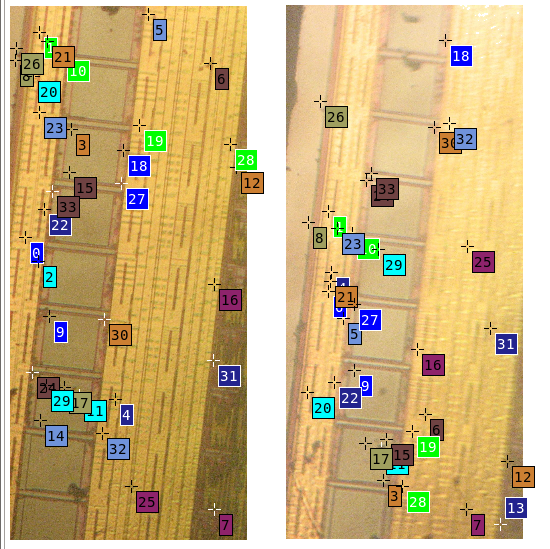
Next, it generates all of the adjacent image pairings (as a generator). The images are cut down to only stitch on a common overlap area. This cuts down processing time considerably, reduces false positives by limiting where matches can be placed. However, we've added some complexity with merging project files, discussed later. Image pairs look something like this:


A lot of the distortion you see I originally thought was due to camera-lens or other similar alignment. I eventually realized it had to do with the non-uniformity of my light source. It has a diffuser filter wheel which seems to have helped a lot. I also put it more off center which decreased intensity, but made the light more regular. In any case, it should be obvious from the above images that photometric optimization is a must for my images.
Next running autopanoaj under Linux required some magic. First, it doesn't behave well to a number of file related options, possible due to WINE imperfections. The only way for it to reliably work is to let it generate its own project file(s) by running it without any file options in the dir you have the images and want the project file(s) in. This requires post-processing to convert the WINE file paths to Linux file paths for the image names.
After that, projects are combined with pto_merge. While autopanoaj produced fairly lean projects, pto_merge seems to shove a bunch of junk in. This was creating some issues, so I decided to filter a lot of this out.
Finally, I do some post processing to get things closer to the final output. This includes changing the mapping to rectilinear and changing variables to only d (x) and e (y) optimization. Currently, stitching has to be finished in the GUI. This should be fixed if I can eliminate more control point gaps by image processing.
.pto documentation is surprisingly scarce among panotools. I don't know if I'm just not looking in the right place. I eventually realized that the suite that pto_merge is part of has some good documentation and was quite happy to find good documentation on the .pto format. Would be something good to add to the panotools wiki. I just requested mailing list membership and might bounce some of my ideas off of them.
One of the issues is that some of my images are of such poor quality that RANSAC / min result thresholding rejects the control points entirely. This is usually due to a blurry image. Example troublesome pair:


If I remove RANSAC, I can get it to generate a very poor match:
After a suggestion from someone, I played around with Kolourpaint image transforms and observed that softening the images (blurring sorta) causes the features to be uniform in both and can successfully generate accurate control points. Although the images look somewhat different, the control points are still in the same location on the original images. Example transformed images:


Wow! What an improvement. The new set was ran with RANSAC since it generated so much better data. I have yet to figureout how to implement an equivalent transform in Python, although I did some preliminary tests with ImageTransform.* and haven't tried very hard yet.
I've also been working on fully decoding a CD4011. Hopefully I'll have a write-up of that soon. In some ways, large CMOS designs are easier than small jobs because standard logic cells and other components have to be more regular for large designs to scale. That aside, the schematic is rather simple and other factors make the number of permutations fairly small. The main issue has actually been how to record the circuit nicely. My main choices so far seem to be the visual6502 Python GUI and Gimp. I've found GIMP not so user friendly, although I hear its not so bad once you get use to it. I'm not sure if any pictures of the layout editor have been published and I don't remember any restrictions not to publish them, so for those of you who have never seen the layer editor:

I now work for an aerospace company, Skybox Imaging where i'm now starting to learn about rad hard parts. Don't think I can get any from work, but if someone happened to have something, it might be fun to image and compare to other parts (maybe not be able to publish if ITAR issues though). Finally, someone suggested I submit something to kickstart, so I figured why not. Better toys, better research.
EDIT:
Kickstart rejected me, was worth a try. Looking back over tools, Degate is really what I should be using. I played with it a little and and if I really want simulatable results, I'll look into writing a plugin for it to export to visual6502 jsim format. Its too bad I lost the Fairchild CD4011 I had, it looked a lot more like textbook CMOS I had seen. I only got initial images from it and then lost it. Since then, I've gotten better (plastic now) tweezers that tend not to slip and launch things.
